For your information, this documentation is re-created based on https://docs.djangoproject.com/en/2.1/intro/ based on my preference.
In this section, you will learn about the concept of app, model and view.
Let us create a Python application for "online poll" based on Django. The first thing you should do is changing your working directory to your project.
$ cd my_project
STEP 1. Create an application
In order to create an app, you will need "manage.py" created by Django. Once you verify it, you can create "online poll" app by running below command.
$ python manage.py startapp polls
You will be able to see the directory structure like below if you haven't faced any error
polls/
    __init__.py
    admin.py
    apps.py
    migrations/
        __init__.py
    models.py
    tests.py
    views.py
So above directory will be your base camp for "online poll" application.
STEP 2. Creating a first view
Let us open views.py and add some codes like below.
from django.shortcuts import render

# Create your views here.
from django.http import HttpResponse


def index(request):
    return HttpResponse("Hello, world. You're at the polls index.")
The above is the most simple example of view in Django. In order to call view, you should use URLconf in order to have the connected URL. What you should do is just creating a null file as urls.py. You can do it like below
$ touch urls.py
Then you should be able to see your directory structure like below
polls/
    __init__.py
    admin.py
    apps.py
    migrations/
        __init__.py
    models.py
    tests.py
    urls.py
    views.py
And let us put below content to urls.py
from django.urls import path

from . import views

urlpatterns = [
    path('', views.index, name='index'),
]
The next action you should do is adding following two lines to url.py on your project like below.
from django.conf.urls import include
path('polls/', include('polls.urls')),
So, the final code should be like below
from django.contrib import admin
from django.urls import include, path
from django.conf.urls import include


urlpatterns = [
    path('admin/', admin.site.urls),
    path('polls/', include('polls.urls')),
]
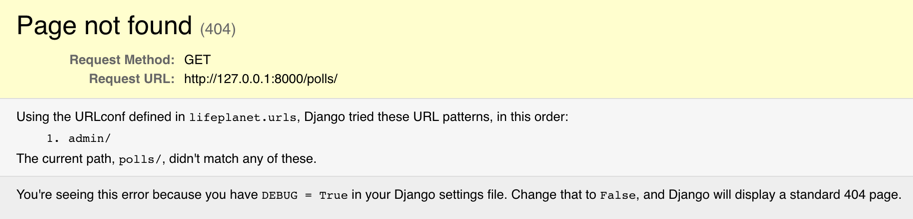
Now index view is integrated with URLconf. Time for you to check your server by following command like
$ python manage.py runserver
If you face an error like below, you should check if your python is properly installed and django is running on virtual environment like I mentioned at "How do I setup Django development environment on Mac?" or not.
STEP 3. Database setup
If everything goes fine, now is time for us to setup a database where can store poll results. Let us do it step by step.
Open up settings.py on your project, and you can see the default database settings like below
settings.py# Database # https://docs.djangoproject.com/en/2.1/ref/settings/#databases DATABASES = { 'default': { 'ENGINE': 'django.db.backends.sqlite3', 'NAME': os.path.join(BASE_DIR, 'db.sqlite3'), } }If you want to use mysql instead of sqlite3, you can use it by replacing as "django.db.backends.mysql". For oracle, it will be "django.db.backends.oracle".
If you are not using SQLite as your database, additional settings such as USER, PASSWORD, and HOST must be added. For more details, see the reference documentation for DATABASES.
Once you set all your requirements, you should run following command.python manage.py migrate
Creating models for online poll.
In our simple poll app, we’ll create two models:
QuestionandChoice. AQuestionhas a question and a publication date. AChoicehas two fields: the text of the choice and a vote tally. EachChoiceis associated with aQuestion.These concepts are represented by simple Python classes. Edit the
polls/models.pyfile so it looks like this:polls/models.pyfrom django.db import models # Create your models here. class Question(models.Model): question_text = models.CharField(max_length=200) pub_date = models.DateTimeField('date published') def __str__(self): return self.question_text class Choice(models.Model): question = models.ForeignKey(Question, on_delete=models.CASCADE) choice_text = models.CharField(max_length=200) votes = models.IntegerField(default=0) def __str__(self): return self.choice_textIf you see above, it looks like a table schema when we create a table in database. I won't elaborate the detail about above for this time.
Activating models
Even though we have created an app at the moment, but actually we can't say "polls" are correctly integrated with the project. In django, we should make some additional action to make it happen.
To include the app in our project, we need to add a reference to its configuration class in the INSTALLED_APPS setting. The PollsConfig class is in the polls/apps.py file,polls/apps.pyfrom django.apps import AppConfig class PollsConfig(AppConfig): name = 'polls'
so its dotted path is 'polls.apps.PollsConfig'. Edit the <your project folder>/settings.py file and add that dotted path to the INSTALLED_APPS setting. It’ll look like this:<your project folder>/settings.pyINSTALLED_APPS = [ 'polls.apps.PollsConfig', 'django.contrib.admin', 'django.contrib.auth', 'django.contrib.contenttypes', 'django.contrib.sessions', 'django.contrib.messages', 'django.contrib.staticfiles', ]Note that 'polls.apps.PollsConfig' is added on top of 'django.contrib.admin'.
Now Django knows to include the
pollsapp. Let’s run another command:python manage.py makemigrations polls
As a result, you should see similar to the following
Migrations for 'polls':
  polls/migrations/0001_initial.py
    - Create model Choice
    - Create model Question
    - Add field question to choice
By running makemigrations, you’re telling Django that you’ve made some changes to your models (in this case, you’ve made new ones) and that you’d like the changes to be stored as a migration.
Migrations are how Django stores changes to your models (and thus your database schema) - they’re just files on disk. You can read the migration for your new model if you like; it’s the file polls/migrations/0001_initial.py. Don’t worry, you’re not expected to read them every time Django makes one, but they’re designed to be human-editable in case you want to manually tweak how Django changes things.
There’s a command that will run the migrations for you and manage your database schema automatically - that’s called migrate, and we’ll come to it in a moment - but first, let’s see what SQL that migration would run. The sqlmigrate command takes migration names and returns their SQL:
python manage.py sqlmigrate polls 0001
As a result, you should see similar to the following
BEGIN;
--
-- Create model Choice
--
CREATE TABLE "polls_choice" ("id" integer NOT NULL PRIMARY KEY AUTOINCREMENT, "choice_text" varchar(200) NOT NULL, "votes" integer NOT NULL);
--
-- Create model Question
--
CREATE TABLE "polls_question" ("id" integer NOT NULL PRIMARY KEY AUTOINCREMENT, "question_text" varchar(200) NOT NULL, "pub_date" datetime NOT NULL);
--
-- Add field question to choice
--
ALTER TABLE "polls_choice" RENAME TO "polls_choice__old";
CREATE TABLE "polls_choice" ("id" integer NOT NULL PRIMARY KEY AUTOINCREMENT, "choice_text" varchar(200) NOT NULL, "votes" integer NOT NULL, "question_id" integer NOT NULL REFERENCES "polls_question" ("id") DEFERRABLE INITIALLY DEFERRED);
INSERT INTO "polls_choice" ("id", "choice_text", "votes", "question_id") SELECT "id", "choice_text", "votes", NULL FROM "polls_choice__old";
DROP TABLE "polls_choice__old";
CREATE INDEX "polls_choice_question_id_c5b4b260" ON "polls_choice" ("question_id");
COMMIT;
Now, run migrate again to create those model tables in your database:
python manage.py migrate
You will see following similar results if everything goes fine.
Operations to perform:
  Apply all migrations: admin, auth, contenttypes, polls, sessions
Running migrations:
  Applying polls.0001_initial... OK
But for now, remember the three-step guide to making model changes:
Change your models (in models.py).
Run python manage.py makemigrations to create migrations for those changes
Run python manage.py migrate to apply those changes to the database.
Playing with the API
Now, let’s hop into the interactive Python shell and play around with the free API Django gives you. To invoke the Python shell, use this command:python manage.py shell
Once you’re in the shell, explore the database API:
>>> from polls.models import Choice, Question
>>> Question.objects.all()
<QuerySet []>
>>> from django.utils import timezone
>>> q = Question(question_text="What's new?", pub_date=timezone.now())
>>> q.save()
>>> q.id
1
>>> q.question_text
"What's new?"
>>> q.pub_date
datetime.datetime(2018, 11, 10, 5, 29, 23, 419109, tzinfo=<UTC>)
>>> q.question_text = "What's up?"
>>> q.save()
>>> Question.objects.all()
<QuerySet [<Question: Question object (1)>]>
If everything is okay, you will see the same result except q.pub_date, because that will be based on your current timezone.
In addition, let us add more features in polls/models.py like belowpolls/modes.pyimport datetime from django.db import models from django.utils import timezone # Create your models here. class Question(models.Model): question_text = models.CharField(max_length=200) pub_date = models.DateTimeField('date published') def __str__(self): return self.question_text def was_published_recently(self): return self.pub_date >= timezone.now() - datetime.timedelta(days=1) class Choice(models.Model): question = models.ForeignKey(Question, on_delete=models.CASCADE) choice_text = models.CharField(max_length=200) votes = models.IntegerField(default=0) def __str__(self): return self.choice_textNote that we imported datetime and timezone from django.utils to implement three additional functions on Question and Choice.
Save these changes and start a new Python interactive shell by running python manage.py shell again:>>> from polls.models import Choice, Question >>> Question.objects.all() <QuerySet [<Question: What's up?>]> >>> Question.objects.filter(id=1) <QuerySet [<Question: What's up?>]> >>> Question.objects.filter(question_text__startswith='What') <QuerySet [<Question: What's up?>]> >>> from django.utils import timezone >>> current_year = timezone.now().year >>> Question.objects.get(pub_date__year=current_year) <Question: What's up?> >>> Question.objects.get(id=2) Traceback (most recent call last): File "<console>", line 1, in <module> File "/Users/..../env/lib/python3.7/site-packages/django/db/models/manager.py", line 82, in manager_method return getattr(self.get_queryset(), name)(*args, **kwargs) File "/Users/..../env/lib/python3.7/site-packages/django/db/models/query.py", line 399, in get self.model._meta.object_name polls.models.Question.DoesNotExist: Question matching query does not exist. >>> Question.objects.get(pk=1) <Question: What's up?> >>> q = Question.objects.get(pk=1) >>> q.was_published_recently() True >>> q = Question.objects.get(pk=1) >>> q.choice_set.all() <QuerySet []> >>> q.choice_set.create(choice_text='Not much', votes=0) <Choice: Not much> >>> q.choice_set.create(choice_text='The sky', votes=0) <Choice: The sky> >>> c = q.choice_set.create(choice_text='Just hacking again', votes=0) >>> c.question <Question: What's up?> >>> q.choice_set.all() <QuerySet [<Choice: Not much>, <Choice: The sky>, <Choice: Just hacking again>]> >>> q.choice_set.count() 3 >>> Choice.objects.filter(question__pub_date__year=current_year) <QuerySet [<Choice: Not much>, <Choice: The sky>, <Choice: Just hacking again>]> >>> c = q.choice_set.filter(choice_text__startswith='Just hacking') >>> c.delete() (1, {'polls.Choice': 1})- Creating an admin user
First we’ll need to create a user who can login to the admin site. Run the following command:
python manage.py createsuperuser
Enter your desired username and press enter.
Username: admin
You will then be prompted for your desired email address:
Email address: admin@example.com
The final step is to enter your password. You will be asked to enter your password twice, the second time as a confirmation of the first.
Password: **********
Password (again): *********
Superuser created successfully.
Start the development server
The Django admin site is activated by default. Let’s start the development server and explore it.If the server is not running start it like so:
python manage.py runserver
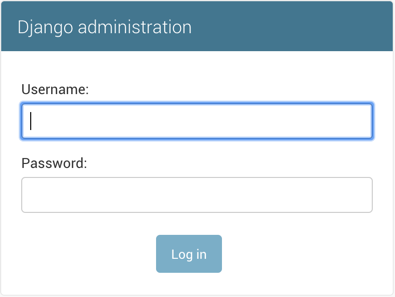
Now, open a Web browser and go to “/admin/” on your local domain – e.g., http://127.0.0.1:8000/admin/. You should see the admin’s login screen:
Enter the admin site
If everything is okay, you will see following screen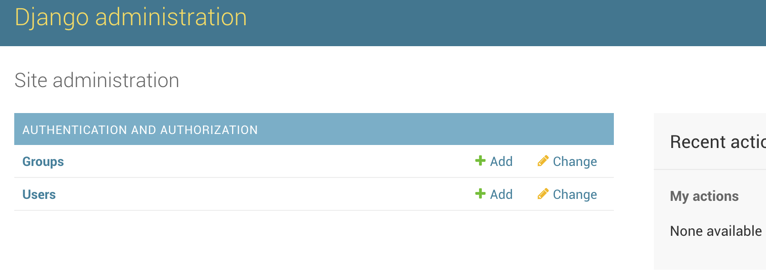
Make the poll app modifiable in the admin
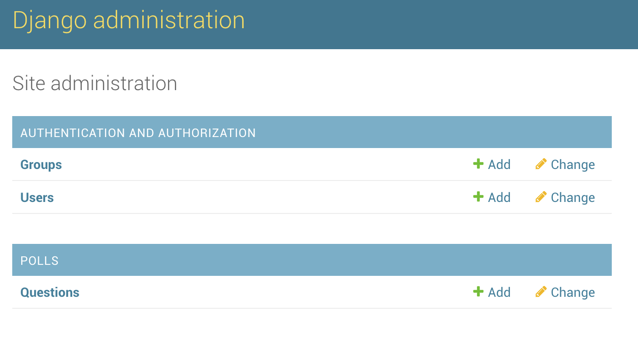
Even though we created an app, that is not appeared on the admin index page.
Just one thing to do: we need to tell the admin that Question objects have an admin interface. To do this, open the polls/admin.py file, and edit it to look like this:from django.contrib import admin # Register your models here. from .models import Question admin.site.register(Question)
- Explore the free admin functionality
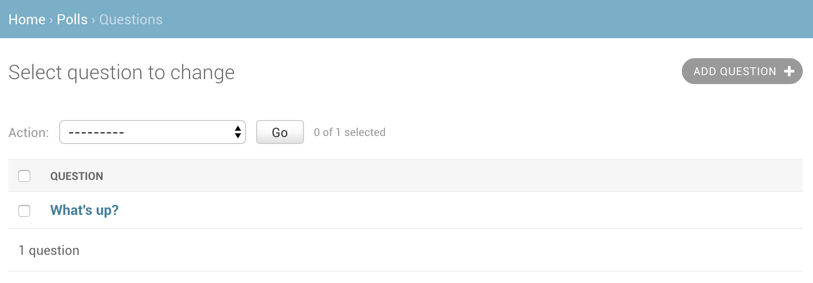
Now that we’ve registered Question, Django knows that it should be displayed on the admin index page:
Click “Questions”. Now you’re at the “change list” page for questions. This page displays all the questions in the database and lets you choose one to change it. There’s the “What’s up?” question we created earlier:
Click the “What’s up?” question to edit it: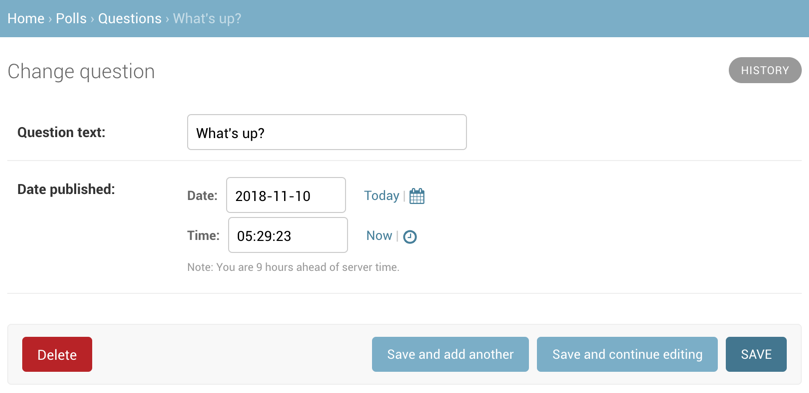
Note that the form is automatically generated from the Question model. I haven't seen such a kind software model in another software languages.
STEP 4. Writing more views with Templates
In Django, web pages and other content are delivered by views. Each view is represented by a simple Python function (or method, in the case of class-based views). Django will choose a view by examining the URL that’s requested (to be precise, the part of the URL after the domain name).
This tutorial provides basic instruction in the use of URLconfs, and you can refer to URL dispatcher for more information.
Let’s add a few more views to polls/views.py. These views are slightly different, because they take an argument:
polls/views.pydef detail(request, question_id): return HttpResponse("You're looking at question %s." % question_id) def results(request, question_id): response = "You're looking at the results of question %s." return HttpResponse(response % question_id) def vote(request, question_id): return HttpResponse("You're voting on question %s." % question_id)Wire these new views into the polls.urls module by adding the following path() calls:
polls/urls.pyfrom django.urls import path from . import views urlpatterns = [ # ex: /polls/ path('', views.index, name='index'), # ex: /polls/5/ path('<int:question_id>/', views.detail, name='detail'), # ex: /polls/5/results/ path('<int:question_id>/results/', views.results, name='results'), # ex: /polls/5/vote/ path('<int:question_id>/vote/', views.vote, name='vote'), ]Take a look in your browser, at “/polls/34/”. It’ll run the detail() method and display whatever ID you provide in the URL. Try “/polls/34/results/” and “/polls/34/vote/” too – these will display the placeholder results and voting pages.
Here’s one stab at a new index() view, which displays the latest 5 poll questions in the system, separated by commas, according to publication date:
polls/urls.pydef index(request): latest_question_list = Question.objects.order_by('-pub_date')[:5] output = ', '.join([q.question_text for q in latest_question_list]) return HttpResponse(output)There’s a problem here, though: the page’s design is hard-coded in the view. If you want to change the way the page looks, you’ll have to edit this Python code. So let’s use Django’s template system to separate the design from Python by creating a template that the view can use.
Create a directory called templates in your polls directory. Django will look for templates in there.
Within the templates directory you have just created, create another directory called polls, and within that create a file called index.html. In other words, your template should be at polls/templates/polls/index.html. Because of how the app_directories template loader works as described above, you can refer to this template within Django simply as polls/index.html.polls/templates/polls/index.html{% if latest_question_list %} <ul> {% for question in latest_question_list %} <li><a href="/polls/{{ question.id }}/">{{ question.question_text }}</a></li> {% endfor %} </ul> {% else %} <p>No polls are available.</p> {% endif %}The problem above is the URL is hardcoded - it may not critical, but let us add more flexibility by the defined argument in the path() function in the polls.urls module, so you can remove a reliance on specific URL paths defined in your url configurations by using the {% url %} template tag like below:
{% if latest_question_list %}
    <ul>
    {% for question in latest_question_list %}
        <li><a href="{% url 'detail' question.id %}">{{ question.question_text }}</a></li>
    {% endfor %}
    </ul>
{% else %}
    <p>No polls are available.</p>
{% endif %}
Now let’s update our index view in polls/views.py to use the template:polls/views.pyfrom django.http import HttpResponse from django.template import loader from .models import Question . . . def index(request): latest_question_list = Question.objects.order_by('-pub_date')[:5] context = {'latest_question_list': latest_question_list} return HttpResponse(request, 'polls/index.html', context)Raising a 404 error
Now, let’s tackle the question detail view – the page that displays the question text for a given poll. Here’s the view:polls/views.pyfrom django.shortcuts import get_object_or_404, render from .models import Question . . . def detail(request, question_id): question = get_object_or_404(Question, pk=question_id) return render(request, 'polls/detail.html', {'question': question})And you will need to have detail.html on template
polls/templates/polls/detail.html<h1>{{ question.question_text }}</h1> <ul> {% for choice in question.choice_set.all %} <li>{{ choice.choice_text }}</li> {% endfor %} </ul>Removing hardcoded URLs in templates by app_name as namespace
The tutorial project has just one app, polls. In real Django projects, there might be five, ten, twenty apps or more. How does Django differentiate the URL names between them? For example, the polls app has a detail view, and so might an app on the same project that is for a blog. How does one make it so that Django knows which app view to create for a url when using the {% url %} template tag?
The answer is to add namespaces to your URLconf. In the polls/urls.py file, go ahead and add an app_name to set the application namespace:
polls/urls.pyfrom django.urls import path from . import views app_name = 'polls' urlpatterns = [ path('', views.index, name='index'), path('<int:question_id>/', views.detail, name='detail'), path('<int:question_id>/results/', views.results, name='results'), path('<int:question_id>/vote/', views.vote, name='vote'), ]
Now change your polls/index.html template from:polls/templates/polls/index.html<li><a href="{% url 'detail' question.id %}">{{ question.question_text }}</a></li>to point at the namespaced detail view:
polls/templates/polls/index.html<li><a href="{% url 'polls:detail' question.id %}">{{ question.question_text }}</a></li>Write a simple form
Let’s update our poll detail template (“polls/detail.html”) from the last tutorial, so that the template contains an HTML <form> element:polls/templates/polls/detail.html<h1>{{ question.question_text }}</h1> {% if error_message %}<p><strong>{{ error_message }}</strong></p>{% endif %} <form action="{% url 'polls:vote' question.id %}" method="post"> {% csrf_token %} {% for choice in question.choice_set.all %} <input type="radio" name="choice" id="choice{{ forloop.counter }}" value="{{ choice.id }}"> <label for="choice{{ forloop.counter }}">{{ choice.choice_text }}</label><br> {% endfor %} <input type="submit" value="Vote"> </form>Note that we’re creating a POST form (which can have the effect of modifying data), we need to worry about Cross Site Request Forgeries. Thankfully, you don’t have to worry too hard, because Django comes with a very easy-to-use system for protecting against it. In short, all POST forms that are targeted at internal URLs should use the
{%csrf_token %}template tagWe also created a dummy implementation of the vote() function. Let’s create a real version. Add the following to polls/views.py:
polls/views.pyfrom django.http import HttpResponse, HttpResponseRedirect from django.shortcuts import get_object_or_404, render from django.urls import reverse from .models import Choice, Question . . . def vote(request, question_id): question = get_object_or_404(Question, pk=question_id) try: selected_choice = question.choice_set.get(pk=request.POST['choice']) except (KeyError, Choice.DoesNotExist): # Redisplay the question voting form. return render(request, 'polls/detail.html', { 'question': question, 'error_message': "You didn't select a choice.", }) else: selected_choice.votes += 1 selected_choice.save() # Always return an HttpResponseRedirect after successfully dealing # with POST data. This prevents data from being posted twice if a # user hits the Back button. return HttpResponseRedirect(reverse('polls:results', args=(question.id,)))Note that we are using the reverse() function in the HttpResponseRedirect constructor in this example. This function helps avoid having to hardcode a URL in the view function. It is given the name of the view that we want to pass control to and the variable portion of the URL pattern that points to that view. In this case, using the URLconf we set up previously, this reverse() call will return a string like
'/polls/3/results/'
where the 3 is the value of question.id. This redirected URL will then call the 'results' view to display the final page.
After somebody votes in a question, the vote() view redirects to the results page for the question. Let’s write that view:
polls/views.pyfrom django.shortcuts import get_object_or_404, render def results(request, question_id): question = get_object_or_404(Question, pk=question_id) return render(request, 'polls/results.html', {'question': question})This is almost exactly the same as the detail() view previously. The only difference is the template name. We’ll fix this redundancy later.
Now, create a polls/results.html template:
polls/templates/polls/results.html<h1>{{ question.question_text }}</h1> <ul> {% for choice in question.choice_set.all %} <li>{{ choice.choice_text }} -- {{ choice.votes }} vote{{ choice.votes|pluralize }}</li> {% endfor %} </ul> <a href="{% url 'polls:detail' question.id %}">Vote again?</a>Now, go to /polls/1/ in your browser and vote in the question. You should see a results page that gets updated each time you vote. If you submit the form without having chosen a choice, you should see the error message.
STEP 5. Optimizing code in Python way - less code is better
The detail() and results() views are very simple – and, as mentioned above, redundant. The index() view, which displays a list of polls, is similar.
These views represent a common case of basic Web development: getting data from the database according to a parameter passed in the URL, loading a template and returning the rendered template. Because this is so common, Django provides a shortcut, called the “generic views” system.
Generic views abstract common patterns to the point where you don’t even need to write Python code to write an app.
Let’s convert our poll app to use the generic views system, so we can delete a bunch of our own code. We’ll just have to take a few steps to make the conversion. We will:
Convert the URLconf.
polls/urls.pyfrom django.urls import path from . import views app_name = 'polls' urlpatterns = [ path('', views.IndexView.as_view(), name='index'), path('<int:pk>/', views.DetailView.as_view(), name='detail'), path('<int:pk>/results/', views.ResultsView.as_view(), name='results'), path('<int:question_id>/vote/', views.vote, name='vote'), ]Delete some of the old, unneeded views.
Next, we’re going to remove our old index, detail, and results views and use Django’s generic views instead. To do so, open the polls/views.py file and change it like so:polls/view.pyfrom django.http import HttpResponseRedirect from django.shortcuts import get_object_or_404, render from django.urls import reverse from django.views import generic from .models import Choice, Question class IndexView(generic.ListView): template_name = 'polls/index.html' context_object_name = 'latest_question_list' def get_queryset(self): """Return the last five published questions.""" return Question.objects.order_by('-pub_date')[:5] class DetailView(generic.DetailView): model = Question template_name = 'polls/detail.html' class ResultsView(generic.DetailView): model = Question template_name = 'polls/results.html' def vote(request, question_id): ... # same as above, no changes needed.
From above, we’re using two generic views here: ListView and DetailView. Respectively, those two views abstract the concepts of “display a list of objects” and “display a detail page for a particular type of object.”
(1) Each generic view needs to know what model it will be acting upon. This is provided using the model attribute.
(2) The DetailView generic view expects the primary key value captured from the URL to be called "pk", so we’ve changed question_id to pk for the generic views.
By default, the DetailView generic view uses a template called <app name>/<model name>_detail.html. In our case, it would use the template "polls/question_detail.html". The template_name attribute is used to tell Django to use a specific template name instead of the autogenerated default template name. We also specify the template_name for the results list view – this ensures that the results view and the detail view have a different appearance when rendered, even though they’re both a DetailView behind the scenes.Similarly, the ListView generic view uses a default template called <app name>/<model name>_list.html; we use template_name to tell ListView to use our existing "polls/index.html" template.
In previous parts of the tutorial, the templates have been provided with a context that contains the question and latest_question_list context variables. For DetailView the question variable is provided automatically – since we’re using a Django model (Question), Django is able to determine an appropriate name for the context variable. However, for ListView, the automatically generated context variable is question_list. To override this we provide the context_object_name attribute, specifying that we want to use latest_question_list instead. As an alternative approach, you could change your templates to match the new default context variables – but it’s a lot easier to just tell Django to use the variable you want.
Run the server, and use your new polling app based on generic views.